janv. 04, 2013
 To begin this new year, I make this post on a subject which can introduce misunderstandings. Previously, Adobe named it streaming server : Flash Media Server (aka FMS) v4.5. In october 2012, Adobe release a new version and recalled the server: Adobe Media Server (aka AMS) v5.0.1. Some acronym used in FMS are the same in AMS, but this is not the same "products" (e.g. PHLS). In this post, I will give some input on live streaming format and especially about security applied on.
HTTP Dynamic Streaming (HDS)
Adobe Media Server is abled to stream (and so repack) 3 HDS formats :
HTTP Dynamic Streaming (HDS)
This is the common HDS format created by Adobe. A HDS content contains 1 XML based manifest file (.f4m), 1 index file (.f4x) and 1 file contained the fragments (.f4f).
Protected HTTP Dynamic Streaming (PHDS)
PHDS adds encryption on the content without using a DRM system like Adobe Access. The content is only encrypted, there is no right management.
To improve your security, you can use too SWF verification. One or more players are declared in a whitelist on the server and only this players can stream contents.
HTTP Dynamic Streaming associate to Adobe Access
To apply some rights on your content, you apply some rules via a DRM system. The Adobe Access license server is optimized to use with HDS. You need to declare on the server some informations from the license server and which DRM policy you want to use.
HTTP Live Streaming (HLS)
In a previous post, I talked on the Flash Media Server 4.5 setup, to be more precise on PHLS setup. There is a big difference, so here, forget the formats in FMS ;-) Adobe Media Server is abled to stream 4 HLS formats. The first is the common HLS and 3 others.
Vanilla
In AMS, Vanilla is the HLS format with an AES-128 encryption applied on the content. You can stream the content with all Quicktime based players (like the player on iOS devices).
Protected HTTP Live Streaming (PHLS)
Here is the main difference between PHLS on FMS and PHLS in AMS. In FMS, PHLS is the HLS with AES. In AMS, PHLS is an encryption on your content without using a DRM system.
HTTP Live Streaming associate to Adobe Access
Like HDS with Adobe Access, you can apply a full DRM solution on HLS. Please notice, this functionality is only available with Adobe Access v4.
For the two last formats, the content can only be streamed by a specific player provided by Adobe.
To finish, when you read the documentation on Adobe developer website, be careful you read the doc related to the good version of the streaming server. Some link in AMS 5.0 reported to the FMS 4.5 ;-)
déc. 19, 2012

Here is a How to, the objective is to demonstrate the setup of a PHLS live stream. PHLS means Protected HLS : the custom format of HLS by Adobe. The protection is realized with a AES-128 encryption on the content. To make this configuration, you need a streaming server which will push content via RTMP. Some live transcoders are available from ElementalLive to ffmpeg. And you need too a Adobe Media Server 4.5 installed to complete this how to. All I write in this post is available via the FMS documentation.
Setup HLS live stream
First, we will push not one, but multiple RTMP streams. Remember, HLS is an adaptive bit rate protocol, so you need to use some bitrate as input. FMS will rewrap the content to the good output. In this case, I will push 4 stream at 200, 400, 600 and 800 kbits/s.
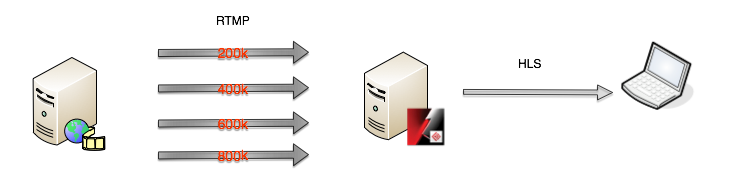
But where do we push the content ? Here is the template url :
rtmp://ams_address/livepkgr/stream_name?adbe-live-event=event_name
Apply this template with the previous data (192.168.0.2 is the address of the FMS), we will have :
- rtmp://192.168.0.2/livepkgr/200k?adbe-live-event=mylive
- rtmp://192.168.0.2/livepkgr/400k?adbe-live-event=mylive
- rtmp://192.168.0.2/livepkgr/600k?adbe-live-event=mylive
- rtmp://192.168.0.2/livepkgr/800k?adbe-live-event=mylive
Ok, now we will check if the stream are correctly pushed. Have a look on the FMS administration and go to Manage Server -> Select the server -> Applications
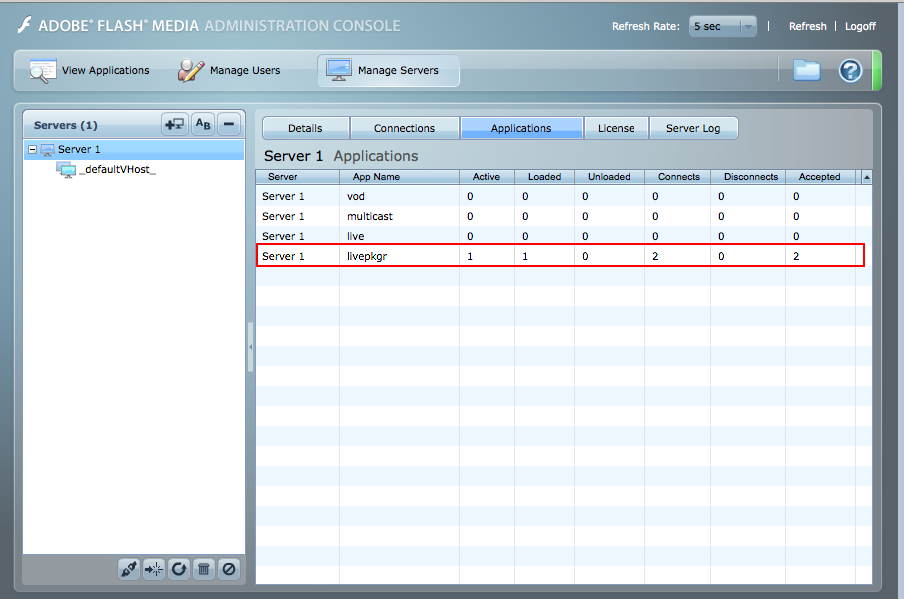
Another solution, to check the content is correctly pushed, is to connect to the server via ssh, in my case (I used Linux), and check if there is some files in /mnt/applications/livepkgr/events/_definst_/eventname* * like this kind of files :
MTQ1OTkwMzc5OQ=.stream or NDE3MDY5NTk0OQ=.stream**. It can be useful to check the presence of this files in order to manage your live stream platform based on FMS.
Then, and here is the magic of FMS :-), you can watch you content... to be more precise, you can stream each bitrate separately with the player:
- http://192.168.0.2/hls-live/livepkgr/_definst_/mylive/200k.m3u8
- http://192.168.0.2/hls-live/livepkgr/_definst_/mylive/400k.m3u8
- http://192.168.0.2/hls-live/livepkgr/_definst_/mylive/600k.m3u8
- http://192.168.0.2/hls-live/livepkgr/_definst_/mylive/800k.m3u8
Try the differents URLs in iOS device, Quicktime or VLC and you can be able to view the live content. We have some single bit rate stream and at the beginning of this post, I wanted an adaptive bit rate live stream .
So finally, we create a m3u8 manifest file which contains our different sub-streams (the manifest for each bit rate).
[bash]
#EXTM3U
#EXT-X-STREAM-INF:PROGRAM-ID=1,BANDWIDTH=200000
http://192.168.0.2/hls-live/livepkgr/_definst_/mylive/200k.m3u8
#EXT-X-STREAM-INF:PROGRAM-ID=1,BANDWIDTH=400000
http://192.168.0.2/hls-live/livepkgr/_definst_/mylive/400k.m3u8
#EXT-X-STREAM-INF:PROGRAM-ID=1,BANDWIDTH=600000
http://192.168.0.2/hls-live/livepkgr/_definst_/mylive/600k.m3u8
#EXT-X-STREAM-INF:PROGRAM-ID=1,BANDWIDTH=800000
http://192.168.0.2/hls-live/livepkgr/_definst_/mylive/800k.m3u8
[/bash]
Put this file at the root folder of FMS and try again with the player (for example the address will be at : http://192.168.0.2/manifest.m3u8). You can view the stream adapt to the band-with available. ;-)
Add encryption and setup PHLS live stream
We made a big part of the job. We have HLS live stream which is adaptive to the bandwidth. The question is how to encrypt the content and this operation will be made by Adobe Flash Media Server. To do that, we need to change configuration files. When you change the configuration, you need to restart FMS :
rootinstall/server restart
The encryption is possible at 3 different levels :
An application is composed by different events. The configuration will be applied to every event in application. The file is located :
rootinstall/applications/application_name/Application.xml
At event level, the configuration files are located in:
rootinstall/applications/application_name/events/_definst_/event_name
If you want all streams (VoD, Live via RTMP, Live via HTTP) will be encrypted, you do it at the server level. The configuration will be updated in :
rootinstall/Apache2.2/conf/httpd.conf
For this example, we apply the configuration on the server level, so in the httpd.conf. To do it, we will add three directives in the file :
- HLSEncryptionScope : declare the scope in which the encryption is applied (server or content)
- HLSEncryptCipherKeyFile : the location of the encrypted key file.
- HLSEncryptKeyURI : the URI added in the manifest file. The file defined in this directive is the same as HLSEncryptCipherKeyFile directive
There is a key file provided when you had installed FMS. It is located in rootinstall/phls/ and named liveevent.bin. Update the Apache configuration file with the good directive's value. The directive are located in the tag :
[bash]\<Location /hls-live>[/bash]
Here is an example
[bash]
\<Location /hls-live>
HLSHttpStreamingEnabled true
HttpStreamingLiveEventPath "/mnt/applications"
HttpStreamingContentPath "/mnt/applications"
HLSMediaFileDuration 8000
HLSSlidingWindowLength 6
HLSFmsDirPath ".."
HLSM3U8MaxAge 2
HLSTSSegmentMaxAge -1
HLSEncryptionScope server
HLSEncryptCipherKeyFile "../phls/liveeventkey.bin"
HLSEncryptKeyURI "http://192.168.0.2/hls-key/liveeventkey.bin"
Options -Indexes FollowSymLinks
\</Location>
[/bash]
Ok, save the file. As you can see, the key will the available at this url http://192.168.0.2/hls-key/liveeventkey.bin but if you try to access it, the file is in 404. It is normal, you need to add one thing in the httpd.conf : the hls-key is not defined, so you need to setup it.
[bash]
\<Location /hls-key>
HLSEncryptHostCipherKey true # if true, this is the cypher key location
HLSFmsDirPath ".." # the folder of the AMS
HLSEncryptKeyRepository "../phls" # the folder where the keys are located
\</Location>
[/bash]
Save the file again and restart the server.
You can now test the stream (http://192.168.0.2/manifest.m3u8) with a HLS player (iOS or Quicktime). To validate the content is encrypted, download one of the substream for example http://192.168.0.2/hls-live/livepkgr/_definst_/mylive/200k.m3u8. You find this line :
[bash]#EXT-X-KEY:METHOD=AES-128,URI="http://192.168.0.2/hls-key/liveeventkey.bin",IV=0XU806869759IJTE74645447[/bash]
If you look it, your content is encrypted, you can now enjoy streaming PHLS live :-)
Sources :
déc. 10, 2012

Mistserver is a open-source multimedia streaming server developed by DDVTech a company based in Netherlands. This server will support some technologies : HLS, HDS, Smooth Streaming, RTMP, ...
For the moment, HDS, RTMP and progressive download are available. You can push too livestream via RMTP. The company have two others solutions : MistSteward, MistCenter.
DDVTech positions his solution in a competitive market with some actors : Adobe Media Server, Wowza, Red5, Apache, ...
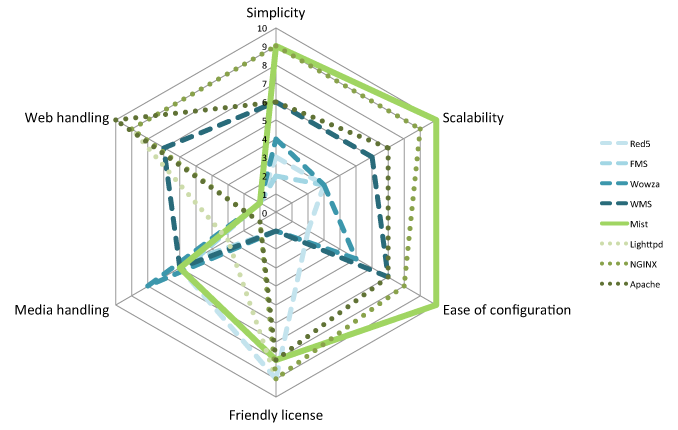
The solution is open-source so the source code is available on GitHub.
The main idea, in the server architecture, is to have a specific process for each viewer. The main concept design is modularity via some Server API.
For this first quick overview, I use a Virtual Machine based on Ubuntu 64bits. In the download section of the site, you have some statics binaries. In my case, I compile the library and the server. You need to install some packages before, if they are not already installed :
apt-get install pkg-config openssl-dev g++
Then, just follow the QuickStart page. When it's finished, have a look on administration home page.
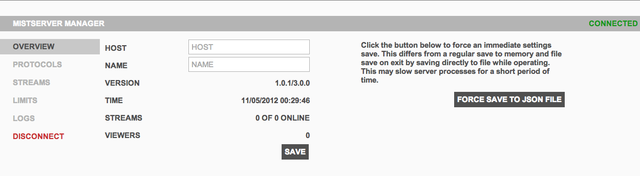 Ok, now I will stream a VoD content. To do that, you need to use a FLV file (named here movie.flv). Please take care when you use the commandline MistFLV2DTSC : you need to have the \< > in your command. The video is piped in the MistFLV2DTSC and then output in the dtsc file.
MistFLV2DTSC < movie.flv > movie.dtsc
MistDTSCFix movie.dtsc
Now, add your content in the administration portal. Go in Protocols and add a new one. You can add 2 types of protocols : HTTP or RTMP and associate it to a port. The interface is the network interface you want to use.
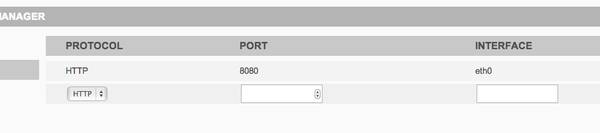
Ok, so your server is set-up to stream file on HTTP and port 8080. Without adding one protocol, you can't be able to stream a content.
Now, add our video (the movie.flv file). Go in Stream, fill a name and a source (the location of the file in the server). 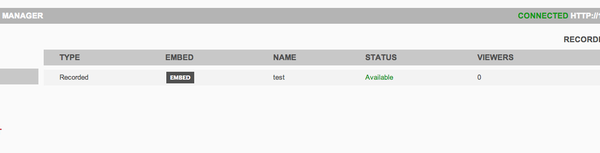 You will see in the server log (available via the Administration interface or via shell)
After few moment, the status updates to Available. You can now preview the content, click on Embed then Preview.
To finish, you can access to your content via differents url for the differents protocols :
- for FLV : http://server_address:port/movie.flv
- for F4m : http://server_address:port/movie/manifest.f4m
Next step is to set-up a live stream and playing with the server, but this is for another post ;-)
Update 12th April 2013 : Release of version 1.1
oct. 30, 2012
The actual market on the OTT use Adaptive Bit Rate video format over HTTP (Smooth Streaming, HTTP Dynamic Streaming, HTTP Live Streaming and MPEG-DASH soon) to deliver the content. I make this analyse without integrate the DRMs system which is a big topic itself. Here is an overview of the different format available for each platform.
[table id=1 /]
The matrix is a kind complex; all this technologies are multibitrate, so for one asset, you need to transcode for each bitrate. Each technology is different and use his own specification :
[table id=2 /]
If I follow the specifications given by the manufacturers (HLS) or if I'm basing on 4 bitrates for the others formats (Smooth Streaming, HDS), I need to transcode more than 20 times the same asset.
There is an option to avoid and reduce significatively the number of transcoding tasks : the packaging on the fly. This article will only analyse the on-demand side, not the live.
Packaging on the fly is possible. If you look the second table, you will see all format can be encoded in H264 and AAC, so you would streamline the number of transcoding tasks from 20 times to 8. I take 8 because this is the number of bitrate given for the iPad encoding video recommandations.
The main idea is : have one ABR streaming format in input, repack in a server the content in anyone others formats. To do that there is different solutions, I group them by type :
- solution self-hosted
- solution provided by a CDN
- solution provided by a Cloud services
Solution self-hosted
Adobe Media Server
Adobe Media Server (previously called Flash Media Server - FMS) is the media server provided by Adobe Systems. The real-time packaging was released in FMS 4.5 for HLS and HDS. The input file will be a f4v or mp4 file (setup to play on-demand MBR)
Currently, there is no support of Smooth Streaming protocol. I don't know if Adobe's team planned it in their roadmap.
Adobe Media Server v5.0.1 (the last one) can be installed on multiple platforms : Linux CentOs, Microsoft Windows Server, Red Hat.
Unified Streaming Platform
 Unified Streaming Platform is provided by CodeShop, a dutch company. For VOD content, the idea is to provide from one unified source (based ISM or F4M files) to every ABR format : HLS, HDS, Smooth Streaming, MPEG-DASH.
To deploy the platform, you need 2 tools :
- mp4split packager which convert mp4 files to fragmented format
- a module for webserver (Apache, Nginx, Lighttpd, IIS) which convert on the fly the input format to the asked output format.
The fact the solution is based on a module for common webserver, it is very easy to monitor.
There is a link to view a demo at the bottom of USP website.
Spectrum
 Seawell Networks, a company based in Portland, Oregon, develop Spectrum. You can use 2 format in input : HLS or Smooth Streaming. In the output, the software provide 3 formats : HLS, Smooth Streaming and HDS.
There are interesting features in this software which are added to the main one :
- the advertising insertion dynamically
- the real-time analytics
- management via APIs
Wowza Media Server
 Wowza is a US company based near Denver in Colorado. The first version was released in 2007 to provide a low cost solution compared to FMS. In Wowza Media Server version 3, released in 2009, they gave the option to use one format to deliver every devices.
The server is available on many platforms : Windows Server, all Linux distributions, Unix and Solaris. You can manage it from an administration UI. Some API (based in Java) are available to create and deploy your own add-on.
If you want more, you can ! Because Wowza give the opportunity to use an add-on which transcode on-the-fly : you have non-H264 input file, the add-on transcode in H264.
Solutions provided by CDN
Akamai Sola Vision
 his own solution of repacking on the fly : Sola Vision.
The input format is a simple MP4 file. You don't need to package your content in one of the ABR format. The solution prepare the content to be streamed in HLS, HDS or FLV.
The main advantage is you have a all-in-one solution : content packaging and distribution via the Akamai infrastructure around the world.
Limelight Deliver Anywhere
 Limelight announced too their own solution : Deliver Anywhere. The content is transformed into the good format : Smooth, HLS.
As Akamai, you can have access to the CDN infrastructure to deliver your content. You can access to complementary services like authentication via MediaVault, Bandwith control, watermarking...
Solutions provided by Cloud services
Windows Azure Media Services
 Windows Azure Media Services was out in preview at the end of last spring. This solution provide some tools to manage and work on videos. One of the last feature which will be implemented in the cloud solution is called Dynamic Remux. One single MP4 file is stored and the asset can be encrypted dynamically and packaged :
- Playready for Smooth, DASH and HLS
- AES-128 for HLS.
As you can see, there is some solution which is available and can respond to your problematic. You can implement one of them in your infrastructure for production or use one of them to manage overload or burst for example.
You have the name of the tools, it's your job to find the good application. If you need it ;-)
sept. 12, 2012
After the first post which give an overview and explain how set-up a WAMS environment, I continue the discovery of WAMS World (sorry for the pun ;-)). In this post, we will see how we can transform a video from a input format to another format. It's possible to generate multiple output format or to encrypt the video. But we will see it in a next posts.
First of all, we need to understand the different terms we will use in WAMS. In my example, I want to obtain this workflow :
- create an asset : an asset is an entity which contains all informations on the video (metadata, ...)
- upload a file in blob storage and associate to the asset
- apply a job on the asset. A job is composed by one or more tasks. A task is an action : eg: encoding with protection. To run the task, we use a MediaProcessor.
- after the job completed, deliver the video via the Azure CDN.
Create an asset
As I said previously, the AMS is based on REST, so you use HTTP verbs to make an action. Here is the PHP class, I used to make API call (I completed the code given in previous post):
[php]class Rest{
protected \$strUrl;
protected \$strToken;
protected \$strBody;
public function __construct(){
\$this->requestToken();
}
private function generateData(\$arrData){
return implode('&', \$arrData);
}
public function requestToken(){
if (file_exists(TOKEN_STORAGE)){
echo 'Get Token from storage'."\n";
\$data = file_get_contents(TOKEN_STORAGE);
\$arrToken = json_decode(\$data);
if ((filemtime(TOKEN_STORAGE) + \$arrToken->expires_in) > time()) {
\$this->strToken = \$arrToken->access_token;
} else {
echo 'Token expired'."\n";
unlink(TOKEN_STORAGE);
\$this->requestToken();
}
} else {
echo 'Get new token from API'."\n";
\$arrData = array(
'grant_type=client_credentials',
'client_id='.CLIENT_ID,
'client_secret='.urlencode(ACCESS_KEY),
'scope=urn%3aWindowsAzureMediaServices'
);
\$arrHeader = array(
'Content-length:'.strlen(\$this->generateData(\$arrData))
);
\$ch = curl_init();
curl_setopt(\$ch, CURLOPT_URL, TOKEN_URL);
curl_setopt(\$ch, CURLOPT_POSTFIELDS, \$this->generateData(\$arrData));
curl_setopt(\$ch, CURLOPT_HTTPHEADER, \$arrHeader);
curl_setopt(\$ch, CURLOPT_RETURNTRANSFER, true);
\$data = curl_exec(\$ch);
curl_close(\$ch);
\$arrToken = json_decode(\$data);
if (isset(\$arrToken->error)){
print_r(\$arrToken);
die();
}
\$this->strToken = \$arrToken->access_token;
file_put_contents(TOKEN_STORAGE, \$data);
echo 'Token save in storage'."\n";
}
return \$this->strToken;
}
public function request(\$arrData = array()){
\$ch = curl_init();
\$arrHeader = array(
'x-ms-version:1.0',
'DataServiceVersion:3.0',
'MaxDataServiceVersion:3.0',
'Authorization: Bearer '.\$this->strToken,
'Content-Type: application/json;odata=verbose',
'Accept: application/json;odata=verbose'
);
echo 'Call API:'.\$this->strUrl."\n";
curl_setopt(\$ch, CURLOPT_URL, \$this->strUrl);
curl_setopt(\$ch, CURLOPT_HTTPHEADER, \$arrHeader);
curl_setopt(\$ch, CURLOPT_HEADER, true);
curl_setopt(\$ch, CURLOPT_RETURNTRANSFER, true);
if (!empty(\$arrData)){
curl_setopt(\$ch, CURLOPT_POSTFIELDS, json_encode(\$arrData));
}
\$data = curl_exec(\$ch);
\$arrInfo = curl_getinfo(\$ch);
curl_close(\$ch);
list(\$strHeader, \$strBody) = explode("\r\n\r\n", \$data, 2);
if (\$arrInfo['http_code'] == 301){
if(preg_match('`\s*Location:\s(.+)`i', \$data, \$arrTmp)){
\$arrTmp[1] = trim(\$arrTmp[1]);
Register::getInstance()->setIndex('base_url', \$arrTmp[1]);
\$this->strUrl = \$arrTmp[1].\$this->getVerb();
echo 'Redirection to '.\$this->strUrl."\n";
\$this->request(\$arrData);
}
} else {
\$this->strBody = \$strBody;
}
}
private function getVerb(){
\$arrUrl = explode('/', \$this->strUrl);
return array_pop(\$arrUrl);
}
}[/php]
You can look, the code manages the token, so you only need to make the API call.
Now, we will create an asset. To do that, we need
- an asset name; in my case : first_sintel_test.
- the URI of the API : https://wamsbluclus001rest-hs.cloudapp.net/API/Assets
We will create an asset with POST verb.
[php]class Asset extends Rest{
public function __construct(){
parent::__construct();
}
public function createAsset(\$strName) {
\$strAPIname = 'Assets';
\$this->strUrl = 'https://wamsbluclus001rest-hs.cloudapp.net/API/'.\$strAPIname;
\$arrCreate = array('Name' => \$strName);
\$this->request(\$arrCreate);
}
}
\$obj = new Asset();
\$str = \$obj->createAsset('first_sintel_test');
print_r(json_decode(\$str));
[/php]
Ok, the server answers, the asset was created. Now, we will verified by listing the different asset. The method below will be added to the previous one.
[php]public function listAsset() {
\$strAPIname = 'Assets';
\$this->strUrl = Register::getInstance()->getIndex('base_url').\$strAPIname;
\$this->request();
return \$this->strBody;
}
[/php]
Note the asset ID, you need it after. Now, we call the list Asset API.
[php]
\$obj = new Asset();
\$str = \$obj->listAsset();
print_r(json_decode(\$str));
[/php]
Good, we have our first_sintel_test asset with his creation date, his status and some others properties. You can filter to get informations about one asset by adding the ID (a unique identifier).
Now, we can upload our file in blob storage.
Upload a file and associate to asset
To upload a file and associate to an asset, you need to give access via policies (time duration and permission: read, write, delete,...). You can create the policy, the process is the same like the Asset creation. Note the access ID, you need it after.
[php]
\$obj = new AccessPolicy();
\$str = \$obj->createAssetPolicy('sintel_policy', 30, 2);
print_r(json_decode(\$str));
[/php]
We have now a policy to upload the file, we have to get a URL path to upload by created a Locator. When it will be created, it will available in the Asset list API. To create a Locator, you need 4 informations :
- the asset ID (you noted it before)
- the access policy ID (noted it too)
- the start time : this one is to give the access in the future or now (have a look on documentation's tips to give access immediately).
- the type of access (SAS, Origin or Azure CDN)
Ok, now we can upload the file with Windows Azure Storage Services REST API. You can check that your video was uploaded correctly via the Azure Portal : Storage -> Select your storage -> Containers and you can see it :
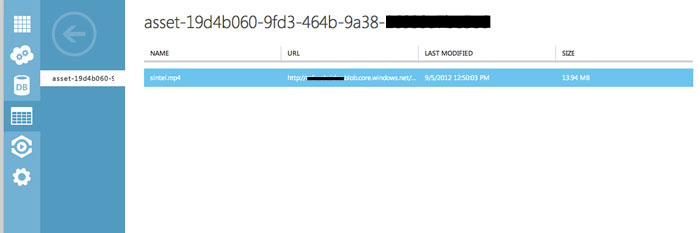
Now, before process the video we need to publish the asset. Take care on the Content-length header's value, it needs to be set at 0. I make a little update on the code.
[php]
public function request(\$arrData = array(), \$strTypePost = false){
....
echo 'Call API:'.\$this->strUrl."\n";
if (\$strTypePost && empty(\$arrData)) {
curl_setopt(\$ch, CURLOPT_CUSTOMREQUEST, 'POST');
\$arrHeader[] = 'Content-Length: 0';
}
curl_setopt(\$ch, CURLOPT_URL, \$this->strUrl);
....
\$this->strUrl = \$arrTmp[1].\$this->getVerb();
echo 'Redirection to '.\$this->strUrl."\n";
\$this->request(\$arrData, \$strTypePost);
....
}[/php]
Then, you will receive a 204 header code.
Create a job
Ok, now, we have the asset and the file. But, in which format do we want to transcode ? Microsoft give us a list of presets to make Task on WAMS : transcode in differents commons formats (for example iOS), apply protection (via PlayReady DRM) or rewrap contents from Smooth to HLS. I choose this preset : H.264 iPod Classic / Nano. We can apply multiple tasks on an asset, but we will this it in a next post.
Let's go to create our first job and apply a task preset.
[php]class Jobs extends Rest{
public function __construct(){
\$this->requestToken();
}
public function listJobs(){
\$strAPIname = 'Jobs';
\$this->strUrl = Register::getInstance()->getIndex('base_url').\$strAPIname;
\$this->request();
return \$this->strBody;
}
public function createJob(\$strName, \$strAssetUri, \$strConfig, \$strProcessor, \$strTaskBody) {
\$strAPIname = 'Jobs';
\$this->strUrl = Register::getInstance()->getIndex('base_url').\$strAPIname;
\$objMedia = new stdClass();
\$objMedia->__metadata->uri = \$strAssetUri;
\$objTask = new stdClass();
\$objTask->Configuration = \$strConfig;
\$objTask->MediaProcessorId = \$strProcessor;
\$objTask->TaskBody = \$strTaskBody;
\$arrCreate = new stdClass();
\$arrCreate->Name = \$strName;
\$arrCreate->InputMediaAssets[] = \$objMedia;
\$arrCreate->Tasks[] = \$objTask;
\$this->request(\$arrCreate);
return \$this->strBody;
}
public function cancelJob(\$assetId) {
\$strAPIname = 'CancelJob?jobid=';
\$this->strUrl = Register::getInstance()->getIndex('base_url').\$strAPIname."'".urlencode(\$assetId)."'";
\$this->request();
return \$this->strBody;
}
}[/php]
This class provides methods to list, create and cancel a job. Here is a API creation call :
[php]
\$objJob = new Jobs();
\$str = \$objJob->createJob('EncoreSecondSintel', \$assetUri, \$strConf, \$strProcess, \$strTaskBody);
print_r(json_decode(\$str));
[/php]
\$assetUri is given when you create the asset, \$strConf is the preset we choose (the string H.264 iPod Classic / Nano), \$strTaskBody is a XML string :
[xml]\<?xml version="1.0" encoding="utf-16"?>
\<taskBody>
\<inputAsset>JobInputAsset(0)\</inputAsset>
\<outputAsset>JobOutputAsset(0)\</outputAsset>
\</taskBody>[/xml]
There is a last parameter : \$strProcess. This is the ID of the MediaProcessor we want to use. There is 4 types of MediaProcessors :
- Storage Decryption
- Windows Azure Media Encoder
- MP4 to Smooth Streams Task
- PlayReady Protection Task
- Smooth Streams to HLS Task
In our case, we are using the Windows Azure Media Encoder, so apply the associated ID give by the MediaProcessor API on the \$strProcess param.
Ok, now we can create a Job. The Job entity have different properties :
- Job ID
- Time datas (creation, end of task, running duration,...)
- State
- Tasks details. This parameter provide us some additionnals informations like the performance :
EncodeTime: 00:00:20.9047240
Avg CPU Load: 70.3% Avg Active Core: 3.9/4
Download: 00:00:02.1264505
Upload: 00:00:09.4015013 |
Great, the job is running, we can follow the progression with the listJobs() method.
When the job is done, the movie is on blob storage in Azure. There is few solutions :
- download the movie
- publish the movie on the Azure CDN (for streaming)
In our case, we will download the movie with Windows Azure Storage Services REST API. After few seconds (or minutes it depends on your movie size), you will have the video on your local storage and view it.
To finish :
- the transfert (upload/download : on/from Azure and from AzureStorage to MediaService instances) on the differents files seems to take more time than the transcoding process
- for a good usage, you need to understand all the entities available and how they will be implemented
- there is many possibilities, so don't hesitate to test the multiple combinaison you think. I will make other(s) post(s) on this subject.
août 24, 2012
I open a serie of posts which will talk about this solution. Microsoft announced at the end of spring the preview of Windows Azure Media Services. WAMS form an extensible media platform that integrates the best of the Microsoft Media Platform and third-party media components in Windows Azure.
Overview
WAMS can transform movie in differents formats and codecs :
- Supported video and audio codecs:
- H.264 High, Main and Baseline Profiles
- AAC-LC
- HE-AAC
- VC-1 (Windows Media Video 9) Simple, Main and Advanced Profiles
- Windows Media Audio Standard
- Windows Media Audio Professional
- Supported format conversions:
- ISO MP4 (.mp4) to Smooth Streaming File Format (PIFF 1.3) (.ismv; .isma)
- Smooth Streaming File Format (PIFF) to Apple HTTP Live Streaming (.msu8, .ts)
For the moment, you can only make VoD video.
It is already possible to encrypt your content (via PlayReady DRM). You can manage it via .NET or REST API. I'm not a .NET developer, so I will try the solution via API. My code side will be in PHP.
Setup
First of all, you need to setup your account to use WAMS. Currently, the setup is only possible via Powershell, but it will change via the Azure portal. For this step, you need a Windows, but after you can use other OS.
To connect to Media services, you need two things : 1) an access token provided by Windows Azure Access Control Services (ACS) and 2) the URI of Media Services itself. To get the token, you make a OAuth request with the parameter you get when you setup your account : the access key and the client ID. Different libraries are available in different langage to make this kind of request, for me, I create a simple PHP method to manage it.
[php]class Rest{

    protected $strUrl;

    protected $strToken;

    protected $strBody;

    public function requestToken(){
        if (!file_exists(TOKEN_STORAGE)){
            echo 'Get Token from storage'."\n";
            $data = file_get_contents(TOKEN_STORAGE);
            $arrToken = json_decode($data);
            if ((filemtime(TOKEN_STORAGE) + $arrToken->expires_in) > time()) {
                $this->strToken = $arrToken->access_token;
            } else {
                echo 'Token expired'."\n";
                unlink(TOKEN_STORAGE);
                $this->requestToken();
            }
        } else {
            echo 'Get new token from API'."\n";
            $arrData = array(
                'grant_type=client_credentials',
                'client_id='.CLIENT_ID,
                'client_secret='.urlencode(ACCESS_KEY),
                'scope=urn%3aWindowsAzureMediaServices'
            );
            $arrHeader = array(
                'Content-length:'.strlen($this->generateData($arrData))
            );

            $ch = curl_init();
            curl_setopt($ch, CURLOPT_URL, TOKEN_URL);
            curl_setopt($ch, CURLOPT_POSTFIELDS, $this->generateData($arrData));
            curl_setopt($ch, CURLOPT_HTTPHEADER, $arrHeader);
            curl_setopt($ch, CURLOPT_RETURNTRANSFER, true);
            $data = curl_exec($ch);
            curl_close($ch);

            $arrToken = json_decode($data);
            if (isset($arrToken->error)){
                print_r($arrToken);
                die();
            }
            $this->strToken = $arrToken->access_token;
            file_put_contents(TOKEN_STORAGE, $data);
            echo 'Token save in storage'."\n";
        }
         return $this->strToken;
    }
}[/php]
The AMS response will contains the token. If you make many calls, I suggest to cache the access token, the expires_in value and the timestamp of the request to avoid unnecessary calls.
Now, we have a token to access, we can play with the Azure Media Services. We will see it in next posts.
juil. 16, 2012
Dans le domaine de la vidéo en ligne, l'une des principales questions ces dernières années fût de migrer des technologies classiques de streaming (RTSP, MMS, RTMP...) vers du téléchargement via HTTP. Et ceci pour plusieurs raisons :
- les coûts moins importants
- le filtrage, les 'anciens' protocoles étaient souvent filtré par les pare-feux
- HTTP ne demande pas de configuration particulière
Ces nouveaux formats deviennent prépondérant notamment dans le domaine des médias.
Le principe
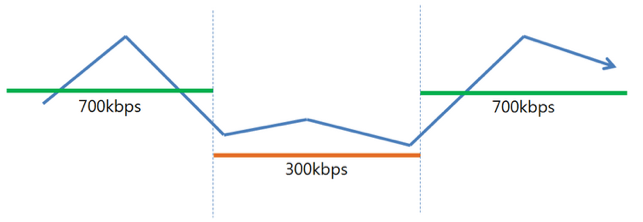
Le concept se présente de la manière suivante : différents débits de la même vidéo sont segmentés, voire fragmentés (ces morceaux de vidéos sont appelées des chunks). On liste ces différents segments dans différents fichiers manifestes permettant ainsi l’ajustement d’un débit à l’autre par le client. Le lecteur de ce dernier teste ainsi régulièrement l’état du débit et télécharge le meilleur segment suivant dans sa mémoire tampon (comme le montre la figure suivante).
L’introduction de ces technologies a permis d’un côté de réduire le coût en bande passante pour la diffusion et la mise en cache de contenu et de l’autre d’optimiser l’expérience utilisateur quelque soit son débit. En revanche, les coûts ont augmentés d’une part en terme de temps de préparation de contenus (notamment en raison des multiples transcodages) ; d’autre part, en terme de stockage de ces mêmes contenus (au lieu d’un seul fichier auparavant, on se retrouve maintenant avec un nombre important de petits fichiers).
Il est important de noter qu’en réalité, les technologies de streaming en multi-débit ne sont pas des technologies de streaming à part entière comme par exemple RTMP ; elles se basent sur le téléchargement progressif des contenus sur le protocole HTTP.
Les formats actuellement disponibles
HTTP Live Streaming (HLS)
 Encore à l'état de brouillon (en version 8) mais fortement déployée, cette technologie est propulsée par Apple. On rencontre des vidéos HLS notamment sur les plateformes iOS (iPhone, iPad, iPod). On peut également en retrouver sur Android (depuis la version 3.0 : Honeycomb) et sur certains modèles de télévisions connectées. HLS se présente sous la forme de manifestes (fichiers textes .m3u8) et de segments vidéos (.ts).
 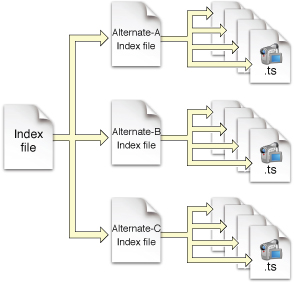 Il est possible de chiffrer les segments via l'algorithme AES. Le lien vers la clé de chiffrement est indiqué dans le manifeste. L'un des gros avantages de HLS est qu'il est possible de diffuser les contenus depuis n'importe quel serveurs HTTP (Apache, NGinx, ...).
NB: dans le cadre d'une soumission d'applications pour l'Apple Store, il est nécessaire de se fier aux spécifications vidéos en fonction de la plateforme cible.
J'avais abordé la vidéo sur iPhone dans un précédent billet.
Smooth Streaming
 Smooth Streaming est fortement lié à l'environnement de développement Silverlight de Microsoft. La diffusion de Smooth Streaming s'effectue via des serveurs IIS intégrant le module Smooth Streaming. La structure d'une vidéo Smooth Streaming se présente sous la forme suivante:
- un fichier manifeste ISM
- des fichiers vidéos ISMV correspondant aux différents débits
Smooth Streaming est utilisé via le plug-in Silverlight pour PC/Mac, sur la Xbox et sur les terminaux mobiles Windows Phone 7.
HTTP Dynamic Streaming (HDS)
 HDS est supporté par Adobe. Fonctionnant sur le même principe que HLS ou Smooth Streaming, HDS est défini via des fichiers manifestes au format XML : F4M et des segments vidéos au format F4V. Une présentation de HDS est déjà disponible.
Pour conclure, il y a cependant un problème à tout cela, il reste toujours 3 formats de diffusion; les impacts sont notamment la multiplicité des encodages des vidéos (et je n'ajoute même pas la gestion de DRM...).
Une solution pourrait tout de même résoudre cela : MPEG-DASH (Dynamic Adaptive Streaming over HTTP). Les différents acteurs citées dans l'article participent à sa définition. Si cette nouvelle technologie était appliquée sur l'ensemble des "écrans", une grande partie des problèmes cités disparaîtrait. Une affaire à suivre...
juin 22, 2012
Cette semaine a eu lieu à Paris, l'AWS Summit, premier événement du genre organisé par Amazon en France. Il a reuni 2 à 300 personnes.

La journée était découpée en deux parties :
- la matinée consacrée à une présentation générale ainsi que deux retours d'expérience (Visiware et Sodexo),
- l'après-midi, plus technique, a permis de voir plus en détails certains des services proposés par Amazon au travers d'exemple d'architecture
Dans ce billet, je vais reprendre l'organisation des différents services proposés sur AWS. Ils sont au nombre de 30 disponibles sur 5 couches.
NB: je m'excuse par avance de la qualité des photos...
Couche 1 : Infrastructure globale d'Amazon Web Services
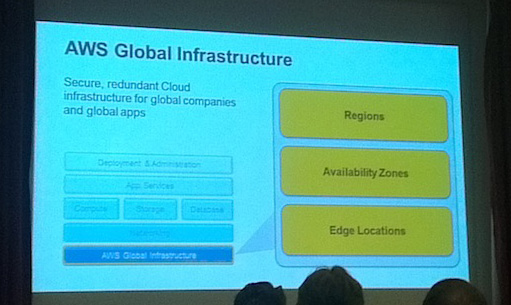
L'infrastructure est organisée en 3 parties:
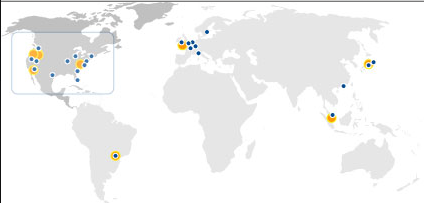
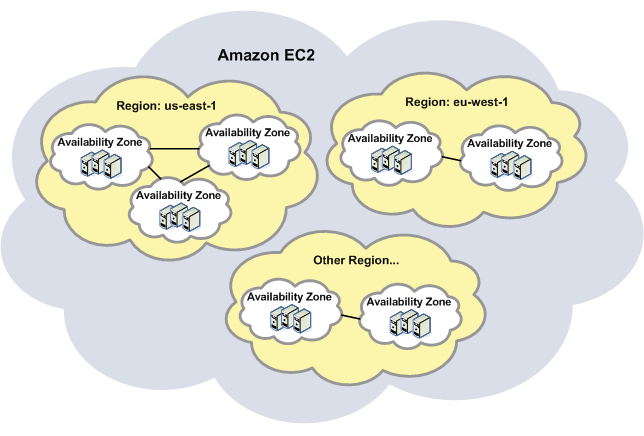
- les **régions**: correspondant aux endroits où se situent les datacenters d'Amazon. [Il en existe actuellement 7](http://docs.amazonwebservices.com/general/latest/gr/rande.html) : 3 aux Etats-Unis, 1 en Europe, 1 en Amérique du Sud, 2 en Asie (en jaune sur la carte).
- les **zones de disponibilités** : au sein d'une même région, il est possible de regrouper des instances d'Amazon au sein de zone de disponibilités.[
](/images/2012/06/Concepts_Regions_Zones.png)
- les **edges** : ce sont des points d'entrées de CloudFront disponible à travers le monde (en bleu sur la carte)
A noter qu'il existe également une région uniquement disponible au gouvernement américain.
Couche 2 : Réseaux
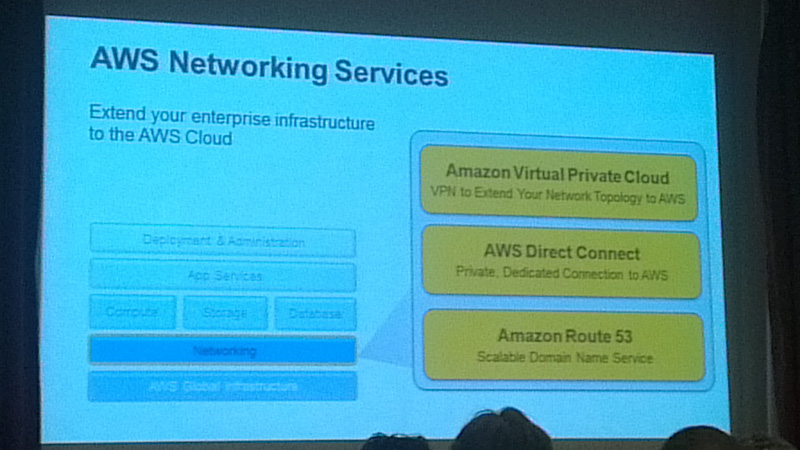
Si vous possédez déjà une infrastructure, il est possible de la connecter via un VPN sur le cloud d'Amazon, permettant aux instances Amazon ainsi d'être sur le réseau privé de l'infrastructure.
Couche 3 : Services de calcul de stockages et de base de données
C'est sans doute le service le plus connu d'Amazon : Amazon EC2 pour Elastic Compute Cloud, ce dernier correspond une instance disposant d'une capacité de calculs et de traitements.
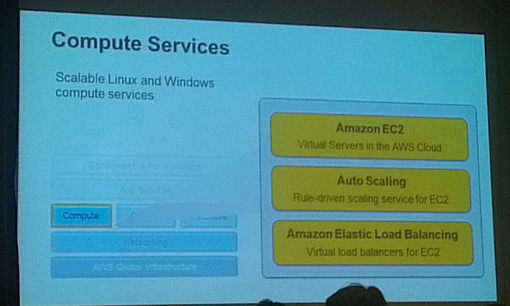
Lors de l'utilisation de multiple instances EC2, il est possible de gérer la charge entre ces instances via l'Elastic Load Balancing et d'augmenter leur nombre automatiquement via l'Auto Scaling.
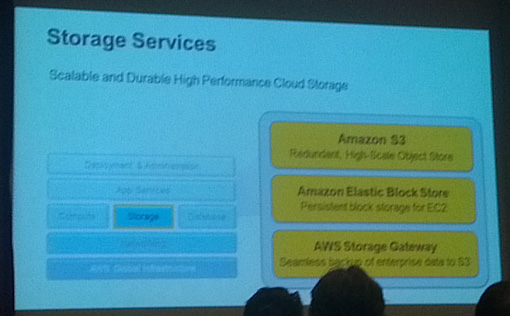
Côté système de stockage, un autre service connu d'Amazon Simple Storage Service (Amazon S3). Il est conçu pour fournir une 99,999999999% de durabilité et 99,99% de disponibilité des objets sur une année donnée et permettant de stocker de 1 à 5 To de données. Ce service est uniquement accessible via HTTP, il est donc tout à fait indiquer pour le stockage de données type média.
Pour stocker les données hors des instances des EC2, Elastic Block Store répond à la demande. Un de ces atouts est d'avoir une très haute disponibilité, il est donc fortement recommandé lorsque l'on utilise des bases de données.
Enfin, AWS Storage Gateway permet d'effectuer des sauvegardes de vos bases (dans votre propre infrastructure par exemple) pour la reprise de services depuis le nuage. L'objectif étant de réaliser une sauvegarde à un instant de vos données.
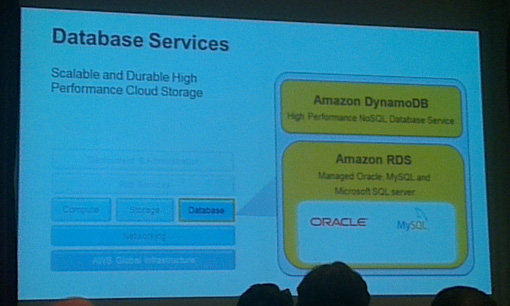
Côté base de données, on pourra au choix utiliser des bases de données relationnelles (MySQL ou Oracle) via Amazon RDS et des bases de données NoSQL via Amazon DynamoDB.
Couche 4 : Ecosystème d'application de services
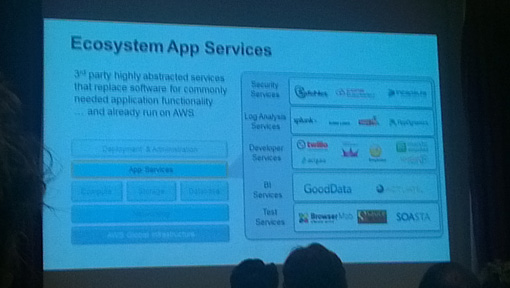
Au dessus des 3 premières couches, il est possible d'installer et d'utiliser les applications.
Tout un ensemble d'applications sont disponibles depuis la sécurité aux tests en passant par les services de développeurs. Des applications spécifiques sont bien entendus également installables.
Amazon met à ce sujet à disponible un espace d'achat/vente de services : l'AWS Marketplace
Couche 5 : Déploiement & Administration
Après avoir choisir votre "structure" de services dans le Cloud d'Amazon, vous allez devoir administrer et déployer.
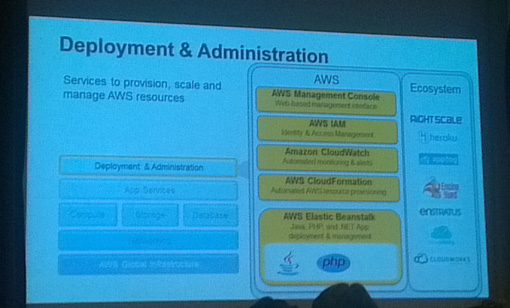
Pour cela Amazon met à disposition un ensemble de services :
Tout ceci montre ainsi l'organisation globale des services Amazon. Tous les services n'ont pas été listés ils sont en effet 30 actuellement. AWS est un service sur étagère permettant de sélectionner le ou les outils dont vous avez besoin.
Dernier point, en créant en compte, il est possible de tester (dans une certaine mesure) une grande partie des services AWS pendant 12mois.
janv. 27, 2012
Afin de répondre à l'émergence de la vidéo sur les nouveaux canaux médias et pour permettre leur diffusion, les systèmes d'informations permettant le traitement des contenus sont de plus en plus hétérogènes. On voit ainsi différentes technologies au sein d'un même système d'information : pour la capture, la transformation des contenus vidéos.
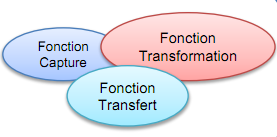
Pour répondre à cette problématique, une task force s'est mise en place : AMWA-EBU FIMS task force.
 Cela nous fait beaucoup d'acronymes, voici leur explication :
- AMWA : Advanced Media Worklfow Association, cette association a pour mission d'améliorer et développer l'utilisation des standards médias.
- EBU : European Broadcasting Union a une mission similaire à l'AMWA en regroupant des européens
- FIMS : Framework for Interoperable Media Service
Le framework FIMS est basé sur une architecture SOA et permet l'interopérabilité entre les différentes entités d'un SI média. Ce framework normalise ainsi leurs échanges en s'intercalant comme moyen de communication.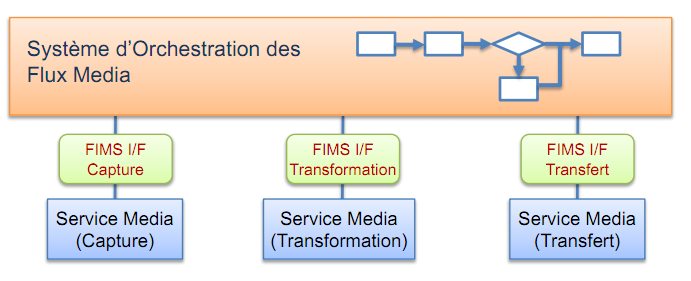
Le projet a été présenté pour la première fois en 2011 lors des gros événements du Broadcast : le NAB (à Las Vegas en avril) puis de l'IBC (à Amsterdam en septembre). Il est actuellement en version 1.0 et rentre dans sa seconde phase. En plus d'être piloté par l'AMWA et l'EBU, des acteurs importants du monde de la vidéo les ont rejoints : Sony, Harmonic, BBC. Le wiki regroupe l'ensemble des documents et des ressources liés à ce projet.
janv. 26, 2012
Cet article est une traduction de l'article de John Crosby : What is HTTP Dynamic Streaming ? Jusqu'à maintenant, la livraison de contenu vidéo sur HTTP était distribué en téléchargement progressif, ceci signifie que pour lire une partie ou rechercher un endroit spécifique dans la vie, vous devez attendre que cette partie se télécharge. Le protocole RTMP permet de réaliser une recherche à n'importe quel endroit du contenu vidéo via streaming, mais requiert une technologie serveur telle que Flash Media Server (produit Adobe) pour effectuer cela.!
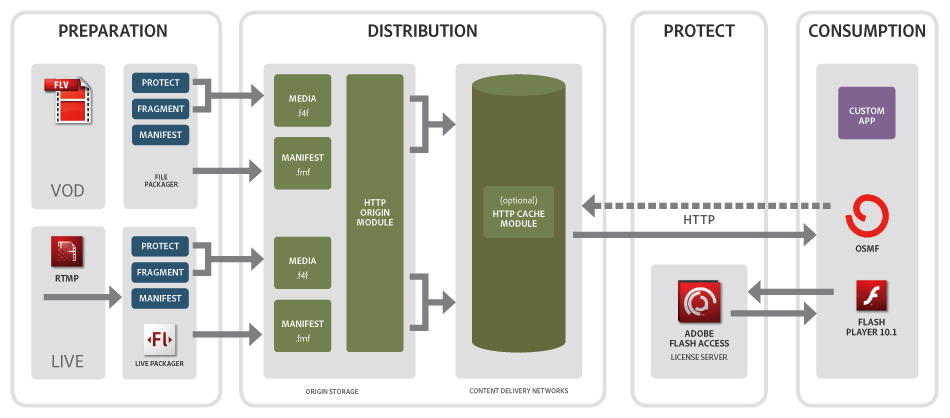
HTTP Dynamic Streaming ou HDS combine HTTP (téléchargement progressif) et RTMP (téléchargement en streaming) permettant de délivrer un contenu vidéo en streaming sur HTTP. Ceci signifie :
- Une technologie de serveur de streaming n'est pas requise, il est juste nécessaire d'avoir un serveur HTTP (ex Apache)
- Les clients peuvent accéder et commencer à lire un contenu 'instantanément'
- Les clients peuvent rechercher des endroits dans la vidéo qui n'ont pas encore été téléchargés.
…et tout cela sur le protocole HTTP.
Il y a un certain nombre de choses que vous devez prendre en compte lorsque vous démarrez avec HTTP Dynamic Streaming.
D'une part, un serveur media pour streamer le contenu n'est pas requis, mais le server Web Apache avec le Module HTTP Origin l'est. Le module HTTP Origin est un module Apache gratuit à l'utilisation fournit par Adobe, et est pré-installé et configuré avec le Flash Media Server quand vous installez le serveur web fourni. L'installation et la configuration du module sera couverte dans un autre article.
D'autre part, le contenu vidéo devra être 'préparé' pour HTTP Dynamic Streaming avant d'être déployé sur votre serveur. Votre workflow de création de contenu devra être ajusté pour accueillir votre contenu vidéo dans un format de fichier F4F. Il existe un outil, le f4fpackager, qu'Adobe a créé pour faire cela pour vous.
La préparation de ces contenus fera l'objet d'un prochain article.